

How a Cherry Pitter changed my Jam Making.
Pitting cherries for Cherry Jam can be a chore but I have found the right Cherry Pitter for jam making. The mess can be greatly reduced and pain is zero.
Why do I make Cherry Jam?
My parents live in Wagga Wagga NSW, which is not far from Young, the cherry capital of NSW, Australia. This gave me the idea of creating a jam made from Cherries. My cherry jam recipe calls for pitted cherries, that is, cherries that have had the pit (the hard seed in the middle) removed. We all know how to eat cherries and spit out the pit, but how do you get the pit out so that the fruit is suitable for jam making.
Attempt #1 using a Knife
I started out small with 1 5kg box of cherries purchased direct from an orchard outside of Young. I had no idea how to proceed, so I used a knife to cut the flesh off the pit. With 5kg of cherries this took me a considerable length of time and made my hands very red.
Attempt #2 using an Olive Pitter
I mentioned to a friend of mine about how difficult it was and how messy, and how nice it would be if there was a tool that could somehow remove the pit from the cherry with less mess. She said that there was, but it was generally called an olive pitter. I immediately ran out and bought one of these and waited eagerly for the following cherry season to begin.
12 months later I bought 2 5kg boxes of cherries and started pitting the cherries with my new fancy olive pitter.
Yes, it was easier to use and less messy than a knife, but as it worked with a similar clasping motion as a pair of scissors or secateurs, my hand was very sore after 10kg of cherries. I looked up commercial brands of cherry pitters and they were all huge and expensive, so no go for a small business owner.
A deeper look online produces results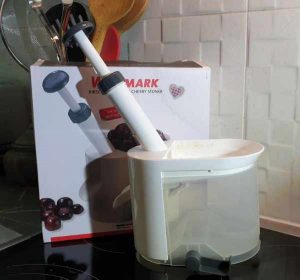
I then started to do a bit of research on the best type of cherries to use for jam making as I had noticed that there was more than the 1 or 2 I knew of. I googled and found an article written by a woman in the USA. With her suggestion of the best variety of cherries she also had a recommendation for a German Cherry Pitter but complained of the price of the pitter. It was US$53 at the time. It used a plunger with a bung so you pushed down on the plunger and the pit dropped into a container and the flesh rolled down the chute. My immediate thought was “$53 is not much if it saves my hands and time”. So I looked online and found it. Ordered it, again ready for next season, and waited.
Cherry Pitting – Attempt # 3 -Success!
12 months later I started with 2 5kg boxes of cherries. Once I got a rhythm up I became quite fast at depitting (don’t know if it is a real word, but in my world it works). I then bought another 2 boxes and processed them. I then went a little out of control and ended up buying 8 boxes all up, processed the cherries and then made the jam. I overestimated the demand for cherry jam and ended up having a cherry jam sale at bargain prices. This was when I first started out making and selling jams, but now the demand is higher and I have Chilli Cherry Jam as well to use up the cherries.
Insider Tips
Back to the pitter. It can miss removing a few pits, but if you keep an eye out for the position of the bung to make sure it stays in place this should cut down on the misses. Also clean out the bits of cherry in the bung area between washing just to keep the mechanism freely working. The action with your arm is pushing on the plunger and you can line up about 10 cherries at a time.
It is a Leifheit 37211 Cherry Pitter, Plastic. and a more up to date model is available from Amazon. I have been able to depit over 10kgs in 1 day without any soreness in my arm or hand. I now do not dread the cherry season.

Cherry Pitter in kitchen

Cherry Pitter shown in 2 parts

Cherry Pitter in 2 parts

Cherry Pitter disassembled
Disclaimer: whichwendyswares.com.au is a participant in the Amazon Services LLC Associates Program. As an Amazon Associate we earn from qualifying purchases. For more information, please contact

Wendy is a 3rd generation jam maker. Wendy is passionate about sharing knowledge, embracing new ideas, and staying true to her rural values.


